TIE DYE 101 WITH EDISTSEW
Looking to get creative and add some color into your wardrobe? You’ve come to the right spot. We teamed up with Brooklyn based vintage tie-dye designer, Edistsew, to learn how to create the perfect tie-dye looks using your favorite Russell Athletic pieces. Gather your supplies and check on the easy step-by-step instructions below to start creating

Step 1: Select Your Styles to Dye.
Using white or a light-colored garment in 100% cotton is going to deliver the best results with vibrant color. Edistsew chose to use the Russell Athletic Cotton Classic styles and expressed well they held the color. A style with higher cotton content such as 80% cotton / 20% polyester can also be used as your next best choice.

Step 2: Wash
When dying new garments, it’s important to prewash everything first. Follow the normal wash instructions listed on the garments to prep for dying.

Step 3: Mix & Prep Dye
While the washing machine is doing its thing, start mixing your dye. For this project, Edistsew used a powder dye in the process. Tye-die kits can be found at your local craft store or many online retailers.
It’s important to use protective gear when mixing and applying dye. A mask will prevent you from breathing in powder and gloves keep dye off skin. When using a powder dye, be sure to it’s mixed well, you don’t want any clumps. Once your dye is mixed, transfer into a plastic bottle used for applying liquid. It is helpful to label each bottle with the color dye as they can look different in liquid form.

Step 4: Pre Soak & Drip Dry
Using a large bucket, mix in soda ash for presoak. Follow the instructions included with the soda ash to ensure proper mixing. Once garments are completed in the washing machine, completely submerge them in the soda ash mixture and let soak for 20 minutes.
After soaking for 20 minutes, ring out garment until drip dry but still wet.
Step 5: Fold & Rubber Band
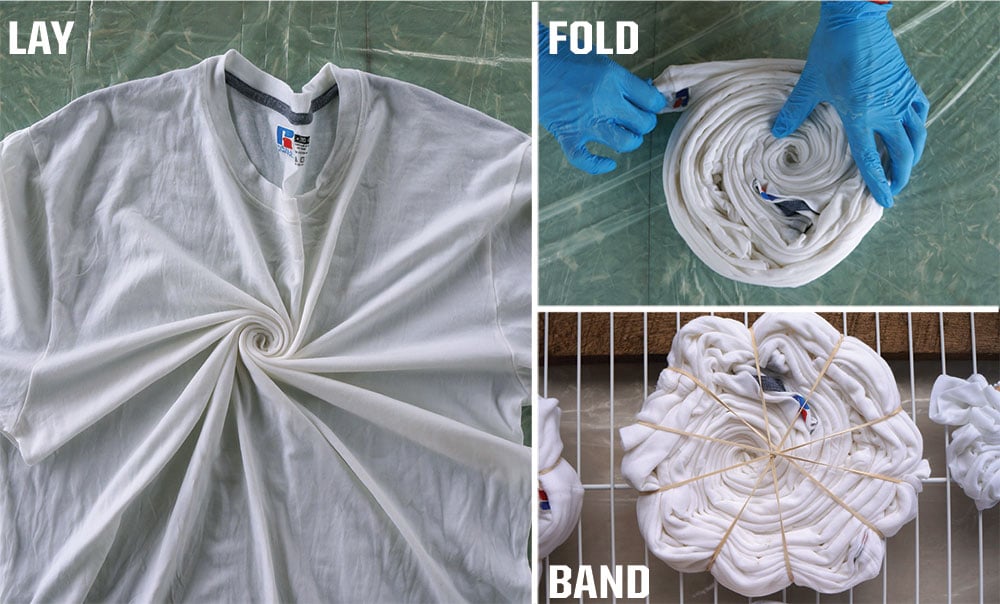
Using a flat surface, layout your wet garment and begin folding and/or twisting to get your desired pattern. Not sure how to fold? A quick google search on “how to fold for tie dye” will provide many options to choose from. Once folded, apply rubber bands. The more colors you want, the more rubber band sections you add.

Step 6: Time for Color
Place bound garment on a wire tray for best results. While wearing gloves, apply the dye in each rubber band section of the garment. Apply to the top of the garment, then flip over and apply to the bottom. When applying colors, be sure to keep colors together as they are on the color wheel for perfect blending.

Step 7: Rest, Rinse, Wash, Wear
Let your dyed garment rest while covered with plastic, for 24 hours. Now it’s time to rinse. While wearing gloves, rinse thoroughly until the water is clear. Run your dyed pieces through the wash, hang dry, and you’re ready to sport your new tie-dyed look!

